August 26, 2013

Review: Maybelline Color Vivids and a Bittersweet Announcement!

Hey Everyone,
            The Pretty Pauper here! Hope you all had  fantastic weekend and are now enjoying this Monday. I don't know how you all spent your Sunday evenings but I spent most of the night reading tweets after tweet about the MTV awards. Man! So much drama and scandal packed into one room. Ha! Well, all drama aside, the stars had some pretty awesome looks tonight which I am always interested in. Now, on to the review!

Today, I am giving you a review on a product i have been using and loving for a while now. It's the Maybelline Color Vivids Lipstick.

Product Summary
These bright shades claim to offer bright opaque color that last all day. The vivids line come in 8 shades and offer a honey nectar formula that claims to soften lips and keep them hydrated. They come in an orange tube and have a color swatch and name on the bottom. They run for about $9 at any drugstore that carry Maybelline.

The Application
The application is pretty normal. No special instructions are stated so I just applied like normal. I noticed the color instantly and on swipe applied a bright, pigmented shade.

The Lasting Power
These bad boys stick well. I did re-apply a few times through out they day when the center or my lips would fade but that was just me being picky. I would say these guys last a good amount of time but they will leave residue on cups or food. These are not a stain so they don't dry out the lips either. 

The Final Word
I love them! These super pigmented shades are now a staple in my makeup collection and really surprised me. They last a long time, the color payoff is good and they come in a variety of fun shades. I look forward to re-purchasing and purchasing other colors in this line! Go get them now!!!

From the Left: Haute Plum, Pink Pop and shocking Coral 

So that's it guys! I know this is a short, to the point review but I wanted to give you guys something to chew on. Now, onto the announcement.

As you know, life can get crazy and that seems to be whats going on here these days. Between work and plans and family, something always gets tossed on the back burner. I have been so busy and my life has been insane! The next few weeks is going to be crazy crazy CRAZY. I have so much to catch up on and I need to take a break. SO, The Pretty Pauper is going on hiatus. I love you all to bits and I will be back within the next few weeks. I am unsure of a date but I will keep you informed and posted. You can follow my twitter for updates or even check out my instagram which are all linked on this home page. When I get back I will be back with full force. I am hoping to have more posts throughout the week and more youtube videos up soon too. My video editing program is giving me technical difficulties and it will take me time to figure those out too. But stay tuned for that. I have an interview with an up-and-coming makeup artist coming your way when I get back as well as a HUGE review on my new Lime Crime Velvetine!!! So stay tuned for that!

I want to take a moment to thank all my loyal readers and members. I love you all and appreciate all your support. I will be back full throttle soon, all I need is some time to re-coup and deal with the craziness!

So, that's about if folks! Please stay tuned. I also want to know....when


I come back, what are some things you want to see on  the blog? Tutorials, more reviews, D.I.Y's...etc? Please let me know.

So, until next time my loves. Au revoir! 

Love,

Sarah XXO

August 17, 2013

D.I.Y Home Facial

Hey All you beautiful people,

              Hope everyone is having a fabulous weekend. I have a treat for you just in time for a lovely Sunday spa day and it's all about how to give yourself a sweet facial to clean out those pores and reveal glowy squeaky clean skin. Please keep in mind that the products mentioned are products that I prefer for my skin type. Use whatever works for yours. So shall we begin?

Step #1- Clip Back Your Hair
This step is actually the most obvious thing ever but I thought I would mention it. You really want to get your hair out of your face so you can work tangle-free on your face. I like using a turbie twist which is a turban style head towel. This really keeps my hair away from my face.

Step #2- Cleanse
Cleanse your skin thoroughly with your favorite facial wash. This is going to get rid of all the surface dirt and oil. I like to use it with a electric facial brush. I use the Olay Fresh Effects Cleanser with the beyond belief electric facial brush.

Step #3- Exfoliate
Exfoliate your skin with a medium grain scrub. You don't want anything too harsh but you don't want anything too fine. I would not recommend microdermabrasion type scrubs as they are too fine for a facial. You want something to really get rid of that dead skin. I like to use the Queen Helene Mint Julep Facial Scrub from Sally's.

Step #4- Steam those pores
 Put on a kettle full of water and bring it to a simmer. Remove from heat and let it sit for 5-10 minutes. Pour into a metal bowl or pot. You can boil in a pot and use it directly from there but transferring it makes it less likely that you will hit your chest and burn yourself.  Sit with your face hovering over the hot water, place a towel over your head and slightly over the bowl to create a "steam room" for your face. Sit like this for 5-10 minutes. The steam will open the pores get all that guck out of your skin. And create a nice surface for our next step.

Step #5- Extract
Alot of bloggers and pro say that your should leave this to the professionals but I have something else to say. My nose collects quite a few blackheads (yuck!) and although after exfoliating and steaming, most are gone, I still have a few deeper stubborn ones that I like to get out. I use the tips of my fingers, NOT MY NAILS, to gently squeeze the surfaced blackheads. They usually pop out quite easily after steaming, as the pores have been enlarged. After this, I wipe my face clean with a clean warm damp cloth. Do not use a cool cloth because the cold will snap the pores shut and make it hard for the next step to do it's job.

Step #6- Mud Mask
This is my favourite step because you get to sit back and relax. Apply your favourite mud mask to your face and neck. After this, sit back and relax for about 5-10 minutes. I like to pop on some relaxing tunes and just lay down on my bed. The mask will settle in the open pores and really kill all that dirt and oil. Rinse the mask off with cool water to help the pores close. My favourite mask is the Queen Helene Mint Julep Mask.

Step #7- Shut those Pores
This step is pretty crucial since you want to avoid dirt and oil clogging your pores again. Take an ice cube and run it through your hands to melt it a little bit. Slowly run the ice cube across your face. Focus on areas where your pores seem to be larger. The cold ice will help to shrink the pores and avoid dirt getting into them. Pat Dry with a clean towel.

Step #8-Serum and Moisturizer
Apply your favourite serum and follow with your favourite moisturizer. Do not skip moisturizer! This is going to help to restore the oils that may have been stripped. If you have oily skin, this is also important because if your body detects that your skin is lacking in oils, it will produce more oils! I like the Beyond Belief Oil Control Serum and The Clean and Clear gel moisturizer.

You should now have smooth, glowy, clean skin! Follow this with your manicure routine for a full-on spa day/night.

Coming later this week, we get an interview with an up-and-coming makeup artist who will give us some makeup tips your can take to the bank. Stay tuned!!!

Have a great night!

XXO Sarah

August 11, 2013

Review: Clean & Clear Morning Burst Gel Moisturizer

Hello Beautiful,

        Yeah, I'm talking to you ;) How are y'all doing? Hope everyones weekend was fabulous and you all are ready for the week at hand. I, for one, had a great weekend. On Saturday I had a great afternoon picnic with a bunch of friends and then headed over to a local jazz festival. Then just vegged out today. It felt great and I am ready for my week!!! I wanted to give you guys a review on a product that I was super excited about from Clean and Clear called Hydrating Gel Moisturizer. The reason why I was excited about this was because I find moisturizers really heavy on my acne prone skin and wanted something a bit lighter. This really intrigued me because of the fact it's a 'gel'. So here is what I thought of it...

The Product
This comes in a 84ml tube and sports green to white ombre affect.   

The Promise

This product promises a light-weight, non-greasy facial moisturizer that will leave your skin replenished. It also claims to be formulated with water and not oil with blends of cucumber and green mango extracts, leaving skin fresh without clogging pores. It also claims to cool on contact and leave skin feeling fresh.

First Impression
 I usually wash my face before bed because through the night the skin heals and therefore it needs to be clean. After washing with my facial wash in the shower, I toned, applied serum and then finally this moisturizer. I squirted it on my hand and it had a cloudy look to it. I dotted it on my 5 points (forehead, cheeks, chin and nose) and then started to rub in. It felt light and fresh bust still felt like it was moisturizing. It didn't feel sticky or icky but felt nice and smooth.

Throughout the Day
I never once noticed it getting oily or greasy while going on throughout the day. It continued to feel cool and soft throughout the day.

Final Word
I actually really love this product!! I am so impressed by the feeling and overall power of this product. I also feel like it helps my makeup apply better. It helps to smooth out my overall makeup. I will continue to use this and will be buying it again.  

So, there you have it! Have you tried this product? Like it? Hate it? Any suggestions for a light gel moisturizer I should try?

Hope you all have a fantastic week and I'll see you next week!

Sarah XXO

Please Note: I am not sponsored or affiliated with any of the companies mentioned about. These are my own opinions.

August 03, 2013

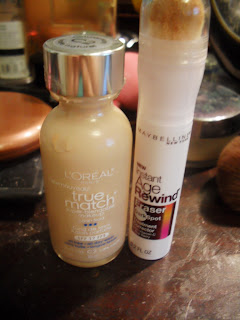
2-for-1 Review: Maybelline instant Age Rewind Eraser and L'Oreal True Match Bleandable Foundation

Hey Dolls! First off I want to apologize for my absence over the last couple weeks. I was trying to stay regular (sounds like I am eating my fiber ;) with my blog post and I failed you all!!! So Sorry. But I was notified 3 weeks ago that I had to move into a smaller house so I had 3 weeks to pack up 23 years of life. So between that and my car blowing up about a month ago life has been crazy.  But you will be happy to know that I am getting back to normal life now and ready to blog some beauty stuff for y'all! Since I have kept all my loyal readers waiting, I am giving you a 2-for-1 Review. Yay!! I thought I'd let you know, as I write this, I am watching West Side Story. So, if I happen to use 'gang' language, you'll know why. Anyways, on to the review! I am giving you a review on the L'Oreal True Match Super-Blendable Foundation and the Maybelline Instant Age Rewind Corrector and Treatment. First of all, Let's start with the foundation.

If you follow me on Youtube, you know I am a loyal fan of the Covergirl 3-in-1 foundation but I needed to try something new. My co-worker and future make-up artist gave me a suggestion of this drugstore foundation and I decided to give it a try. The L'Oreal True Match comes in a cute little 30 ml. bottle and runs for about $12 CAD. The bottle is reminiscent of a magic potion bottle which I thought was adorbs! I purchased the shade C2-Natural Ivory for my pale complexion. The bottle claims that the foundation is a super bendable and gives full coverage. It also claims to blend evenly with your skin tone. The product contains no oil which is perfect for my oily acne-prone skin. It also come in 23 shades and come in warm and cool tones.

My first impression on the foundation was that it was super runny and it had a normal foundation smell. After applying it, I quickly learned that a little goes a looooooong way. Because it's so blendable, you can get away with alot less. The coverage is great and it covered all my acne scaring and hyper pigmentation. But being a full coverage foundation, it didn't feel heavy or thick. I find with my 3-in-1 foundation, I would get alot of build up around my upper lip and I used to think it was clinging to my dry skin but even after exfoliation, i still had it. With this makeup, I didn't have that at all!!!

The staying power was good! I took a picture in the morning and after unpacking some boxes and sweating alot, I still looked decent. Please excuse my no makeup look,  but I felt that since I was just reviewing the foundation and concealer, I didn't need to get all dolled up. Overall, I am impressed with this foundation and look forward to using it more!

Now, on to the concealer! The Instant Age Rewind Eraser for Dark Spots come is a tube and has a little hairy sponge on the top where the product flows from. You twist it and the product flows out. It runs for about $10. I purchased the shade 215 Light.

When I applied it seemed a little light and I wasn't sure how I felt about the coverage and it seemed like an okay coverage. For the sake of the review, I will be honest and say that I wasn't super impressed.

The staying power was okay but not super impressive. Overall, this eraser kind of disappointed me! Below is a before and after picture of the two products together.

Just Applied
After 5 hours


As you can see, the over all look is okay considering I was melting all day but you can see my scars and hyper pigmentation peeping through. I would defiantly buy the foundation again but I'm still not convinced about the eraser yet! I will continue to use it though.

So, there it is Lovelies. Your very own 2-in-1 Review. I hope you enjoyed and please tell me, have you tried either of the products mentioned? How do you feel about the foundation? What about the eraser? Any tips on how to apply them? The floor is yours. Thanks for reading!

Love Sarah XXO